
YARNSHAPE GUIDE
Get started with Design and Make
Keep this guide open in a separate tab while exploring the studio. Start with a small reversible change and check the save status before leaving your work.
1. Open an example in Design
Open the studio, then choose Project → Open an example. Choose YarnShape Kitten and open it. Viewing an example does not save over your work. Its eight parts are a box body, four tube legs, two tapered ears and a tube tail. Wait for preparation to finish. Select a piece in Your pieces and check that its name agrees with the inspector.
Turn view changes the camera; Move and Rotate change selected-piece placement. Fit brings the creation into view. These positions are schematic, not measured sewing locations.
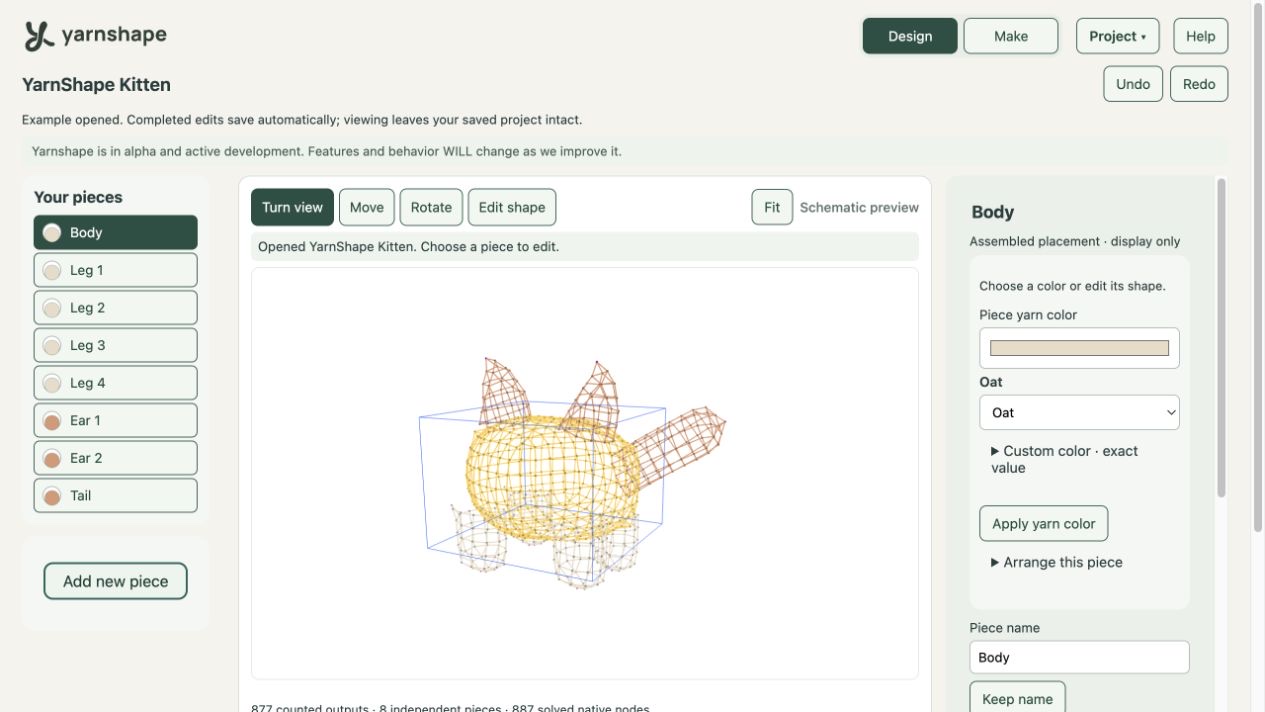
YarnShape Kitten adapts CraftyBunnyBun’s Cube Kitty Cat under CC BY-SA 4.0, with changed constructions, counts, proportions and colors. No endorsement is implied.
2. Change one piece
Choose a named yarn color and apply it. Choose Edit shape to open a modal with the selected piece’s supported controls and native preview. Its Make Change, Cancel and quieter Preview actions stay visible while the form scrolls. Background controls are inactive. Fixed or unsupported pieces explain their limits; a color change does not change construction. Choose Make Change to apply the current shape, or Cancel to leave it unchanged. The quieter Preview action changes only the canvas. Review the written instructions after saving the shape. Use Undo to reverse a committed experiment. Completed changes save automatically in this browser; wait for the saved status before leaving. Clicking outside the modal does nothing. Escape closes a clean editor; for an unfinished edit it offers Make Change, Discard changes or Keep editing. Deliberate Cancel discards the isolated draft.
For a Round body, Shape size shows Widest round (requested stitches, 7–40) and Height setting (-1 automatic; otherwise 3–32). The widest-round value requests a circumference stitch count; the height setting is adjusted by the recipe. Read the current construction summary for actual rounds and stitch counts. Detailed generator controls remain under Advanced recipe options.
A new library Tube starts with 15 stitches around and eight straight rounds, both ends open. Stitches around (circumference) accepts 3–255 and Straight rounds accepts 1–255, as whole numbers. Straight rounds exclude foot and top shaping. Choose Bottom end and Top end independently. Bottom offers Open or Crocheted end · magic ring; Top offers Open or Closed · narrow, then sew. A closed top narrows, then needs sewing after making. Open-bottom foundation chains and the joining slip stitch are uncounted in body totals. The complete Tube must fit 1,024 stitch and foundation points per piece. The two maxima cannot be combined: 255×255 is refused, and closed ends use extra points. A refusal retains the fields. Older saved profile Tubes retain their relative controls until you explicitly choose Use exact Tube counts and apply the conversion with Make Change; Cancel preserves the original. Cube Kitty’s source leg recipe retains 3–9 straight rounds of ten stitches and fixed width.
Pear, Cone, Egg, Capsule, Open cup and Custom piece show Widest circumference target (stitches), from 6–128, and Total rounds target, from 4–128. Total rounds include shaping. Review the actual generated rounds, widest stitch count and total stitch/foundation points; the whole piece must fit the 1,024-point budget. Shaping can adjust actual counts, and the summary flags target differences. A new Pear starts with a 36-stitch circumference target and 24 rounds, upright with its broad belly below its neck. A stitch circumference measures around the fabric, not its radius or diameter. The outline graph labels circumference stitches and rounds and preserves their aspect ratio. Existing-piece shape edits preserve placement. Counts and targets do not establish made dimensions or fit.
Crocheted end · magic ring describes a crocheted start. A top marked Closed · narrow, then sew still requires sewing after narrowing; it is not a crochet-across closing seam. Original Kitty legs start with a magic ring, increase from five to ten stitches and keep their top open. A closed preview surface does not replace the written finishing instructions.
Rounded-box limits depend on the other requested dimensions. The controls show the feasible maximum for the current combination, subject to the 128-course and 1,024-point construction limits. A numeric target is not a promise that every width, depth and height combination will fit; review refusals before committing.
3. Choose, configure and place a piece
Choose Add new piece in the sidebar, then choose a visual card in the compact parts catalog, including Custom piece for an outline. Leaf is not offered for new pieces; existing saved leaves remain readable. Configure the new piece before placing it: use its shape modal or Configure dialog, review the current counts and continue to placement. For a new profile, Make Change advances to placement. Review the position, reference piece and attachment intent before Confirm placement. Cancel discards the addition and leaves the previous creation intact. Confirmation creates one change that Undo can reverse.
Sew on after making is the default supported connection intent. It records an approximate plan; touching shapes and positioning controls do not make an actual seam, invent seam stitches or supply a needle path. To start a separate creation, choose Project → New creation and a starting shape. Its Open an example instead link opens the visual example picker.
To remove a selected piece, press Delete or Backspace outside a text field. Review the named confirmation and any associated plans before deleting. Undo restores the committed removal. The keys continue editing text while a text field or another dialog is active.
New creations start with Balanced solver layout. If an older saved creation uses Quick and its schematic looks poor, open View options → Solver layout → Balanced. This recalculates the schematic; review it and check the save status. Existing saved layouts are preserved until you change them.
4. Check autosave and reopen your work
Completed edits, notes, yarn colors, progress and preferences save automatically in this browser. Undo and Redo save the resulting creation too. Unfinished forms, shape previews and unconfirmed placement stay as drafts; apply or confirm them to keep the change.
Wait for the saved status. If saving fails, keep the page open, read the recovery message and use Retry save now. Use Reopen saved project to check the current saved creation. When a new creation or an edited example replaces the saved creation, your previous project is preserved first; use Previous saved projects → Reopen to return to it. Simply viewing an example does not overwrite your saved work.
These saved projects remain in this browser and origin; they are not a cloud copy or a downloaded backup. Browser storage can be removed or evicted, and another browser will not have these projects.
For offline use, choose Project → App availability → Make available offline and wait for success. Bookmark the current app page and reopen that same pinned page while offline. The website’s Studio link is a network launcher and needs a connection. Offline availability keeps the app available; check autosave separately to keep your creation.
5. Read in Make
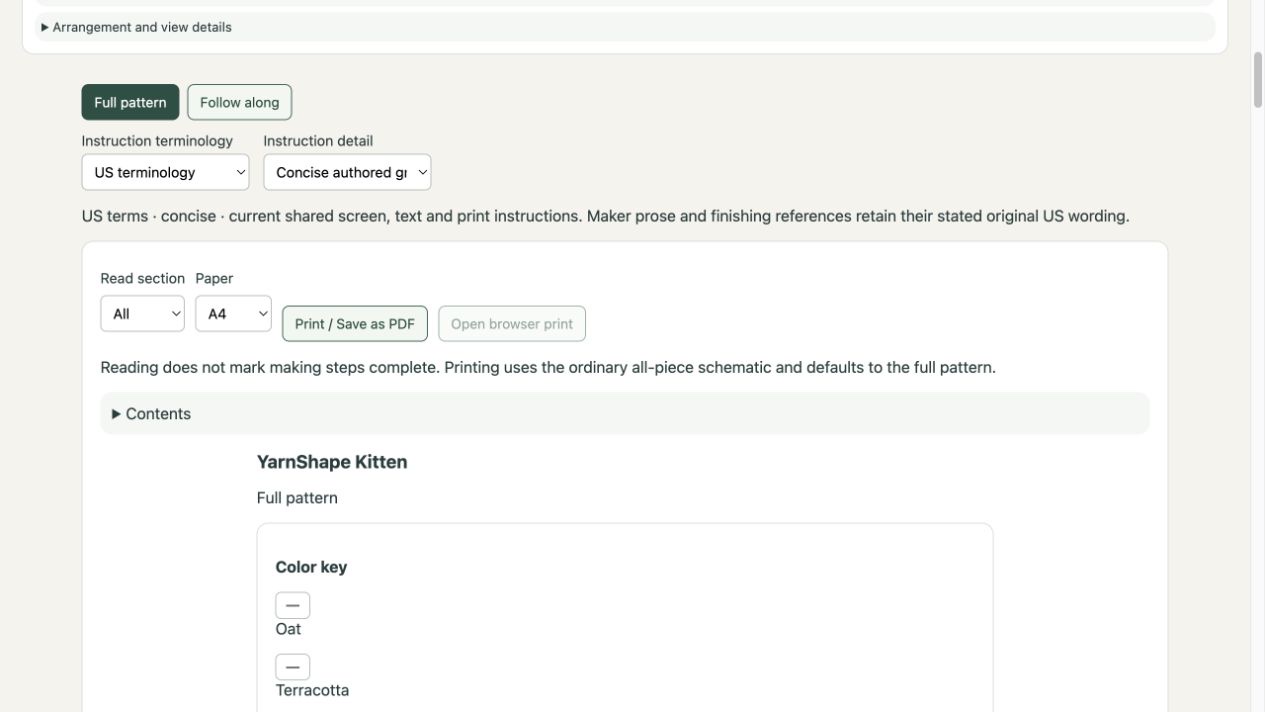
Choose Make → Full pattern → All. Review materials, each piece’s instructions, finishing and unresolved assembly notes before making. Follow along reads the same current instruction source. Mark progress only as you actually work.
6. Review the print scope
The section you are reading and Print scope are separate. Choose full pattern or the intended selected section explicitly, prepare A4 or Letter, then review quantities, color key and ending guidance. Print / Save as PDF prepares the document; Open browser print opens your browser’s printing controls.
Make a sample to check size, stuffing and assembly. A successful preview or matching stitch count does not validate a finished object.